Building a pergola on a deck requires anchoring vertical posts directly into the deck’s structural frame rather than the surface boards. The process involves reinforcing the sub-floor with blocking, securing posts with galvanized coach bolts, installing horizontal support beams, and spacing rafters evenly to ensure structural integrity and wind resistance.
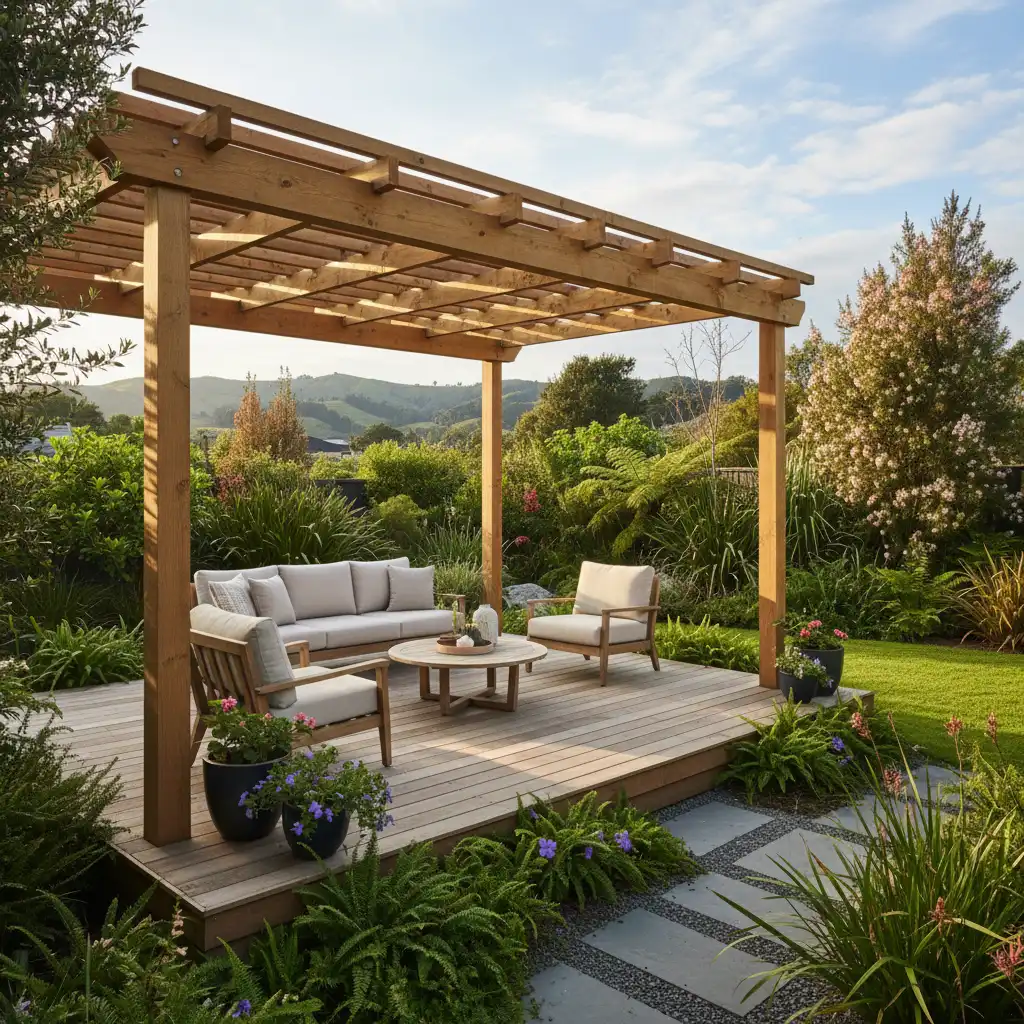
Transforming your existing deck into a shaded sanctuary extends your living space and increases property value. In New Zealand, where the UV index is high and outdoor living is a cultural staple, a well-constructed pergola provides essential shelter and defines the “outdoor room.” However, unlike building on a concrete pad, constructing a pergola on a deck presents unique structural challenges, specifically regarding load distribution and wind uplift.
Planning and Compliance in NZ
Before purchasing your first length of timber, it is imperative to understand the regulatory environment. In New Zealand, under the Building Act 2004, many pergolas are considered “exempt building work” provided they meet specific criteria. Generally, a pergola does not require a building consent if it is under 20 square meters (for attached structures) or 30 square meters (for detached structures), provided it is on the ground floor and does not exceed height-to-boundary restrictions.
However, when building on a deck, you are altering the load on an existing structure. If the deck is more than 1.5 meters off the ground, or if the pergola will have a solid roof (changing it from a pergola to a veranda/porch), you may trigger consent requirements due to wind loading and snow loading calculations. Always check with your local council (e.g., Auckland Council, Wellington City Council) before commencing work.
Essential Tools and Materials List
To build a pergola that withstands the elements, you must use materials rated for outdoor use. In NZ, this typically means Pinus Radiata treated to H3.2 or H4 standards.
Required Materials
- Posts: 100x100mm or 125x125mm H4 treated timber (H4 is preferred for ground contact, but highly recommended for posts on decks due to moisture traps).
- Beams (Bearers): 150x50mm or 200x50mm H3.2 treated timber (size depends on span).
- Rafters: 150x50mm H3.2 treated timber.
- Battens (Optional): 50x50mm for top shade.
- Hardware: M12 Galvanized or Stainless Steel (for coastal zones) coach bolts, washers, and nuts.
- Post Anchors: High-wind post brackets if not bolting through joists.
- Screws/Nails: 90mm galvanized framing nails and 100mm exterior structural screws.
Essential Tools
- Circular saw and drop saw (mitre saw)
- Impact driver and cordless drill
- Spirit level (1200mm or longer)
- Socket set (for coach bolts)
- Clamps (quick-grip style)
- String line and chalk box
- Ladder (industrial rating preferred)
- Personal Protective Equipment (PPE): Earmuffs, safety glasses, dust mask

Assessing Deck Strength
Can my deck support a pergola?
This is the most critical question. A standard residential deck is designed to carry a “live load” (people and furniture) of roughly 1.5kPa to 2.0kPa. Adding a pergola adds “dead load” (the weight of the timber) and, more importantly, “wind load.” A pergola acts like a sail or a lever. Strong winds pushing against the pergola posts create massive torque at the base connection point.
If your deck framing consists of 100x50mm joists, they may not be sufficient to anchor a tall pergola post without significant reinforcement. You must ensure the sub-structure (bearers and piles) is sound. If the deck boards are rotting or the frame feels bouncy, repair the deck before adding the pergola.
Critical Step: Securing Posts to Decking
The failure point of most amateur pergola builds is the post-to-deck connection. Screwing a post bracket into the top decking boards is never sufficient. The decking boards will rip out under wind pressure.
Method 1: The Through-Bolt Method (Strongest)
This method involves removing decking boards to access the frame or working from underneath the deck.
- Identify Joist Locations: Plan your post locations so they sit directly adjacent to the deck joists or bearers.
- Blocking/Nogs: Install solid timber blocking (nogs) between the joists where the post will sit. This creates a solid mass of timber to bolt through.
- Drilling: Position the post against the joist/bearer. Drill two 12mm holes through the post and the joist/bearer. Space them at least 100mm apart vertically to prevent splitting.
- Bolting: Insert M12 galvanized coach bolts with large washers on both sides. Tighten securely.
- Re-decking: Cut the decking boards around the post and reinstall them.
Method 2: High-Wind Post Anchors
If you cannot access the sub-frame, you must use structural post supports that are bolted through the deck into the joist below.
- Locate the joist center lines using a stud finder or by looking at existing nail lines.
- Position the heavy-duty post anchor directly over the intersection of a joist and a bearer if possible.
- Use M10 or M12 coach screws (lag bolts) that are long enough to penetrate the decking and go at least 70mm into the joist below.

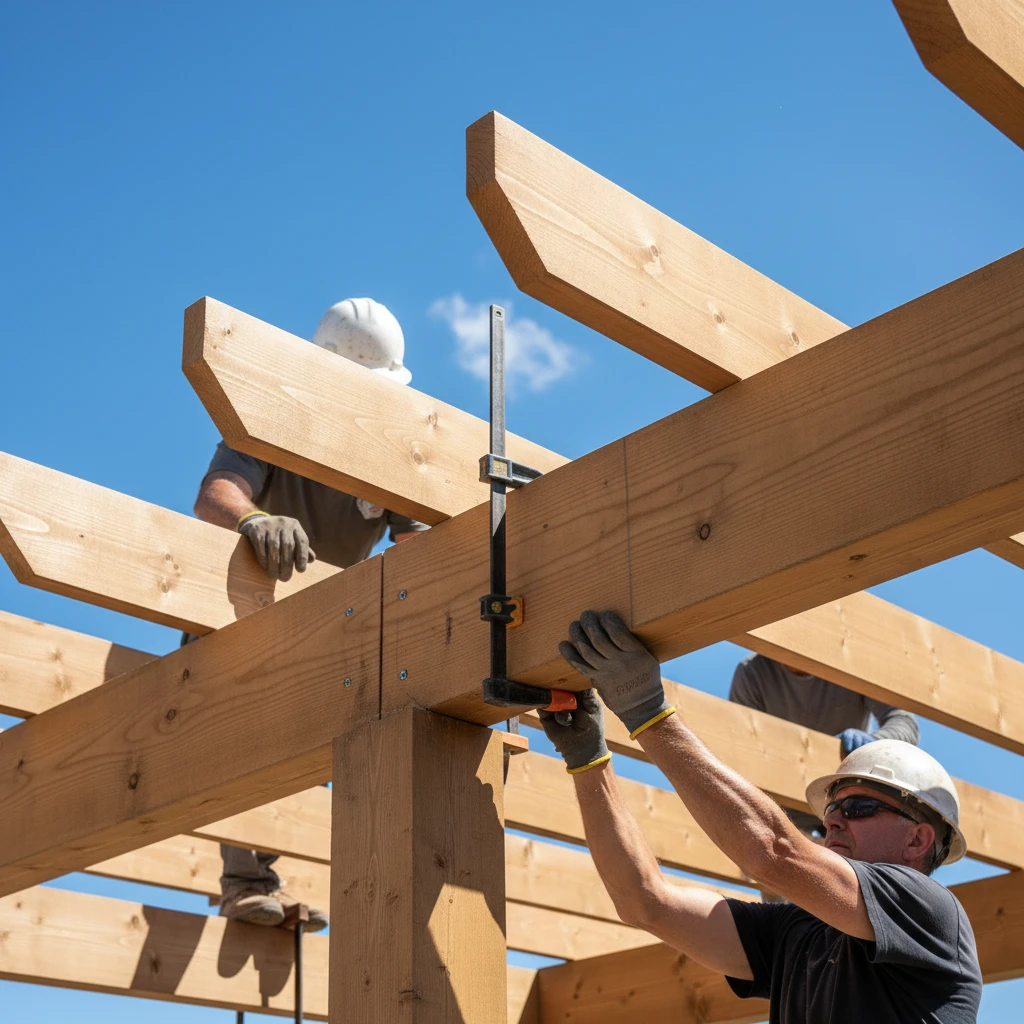
Framing and Rafter Spacing
Once your posts are plumb (vertically straight) and secured, the overhead framing begins. This creates the “roof” of your structure.
Installing the Beams
The beams carry the weight of the rafters. There are two main ways to attach beams to posts:
- The Sandwich Method: Use two beams (e.g., 150x50mm), one on either side of the post. Secure them with M12 bolts running through the beam-post-beam sandwich. This is incredibly strong and aesthetically pleasing.
- The Notch Method: Cut a rebate (notch) into the top of the post to seat a single larger beam (e.g., 200x100mm). This transfers the load directly down the post grain.
Rafter Spacing Guidelines
Rafters sit perpendicularly across the beams. The spacing depends on what you intend to put on top:
- Open Pergola (No Roof): Spacing is aesthetic. 600mm to 900mm centers are standard.
- Polycarbonate Roofing: If you plan to add clear roofing later, you typically need rafters at 900mm centers with purlins (battens) running across them, or rafters at 600mm centers depending on the roofing manufacturer’s specifications (e.g., Alsynite or Suntuf).
- Shade Cloth: 900mm spacing is sufficient.
Attach rafters to the beams using galvanized skew nails, or for a cleaner and stronger finish, use hurricane ties or rafter hangers. If using the sandwich beam method, rafters can simply sit on top and be skew-nailed or screwed with 100mm bugle-head screws.
Safety Tips for DIYers
Building a pergola involves heavy lifting and working at heights. Prioritize safety to prevent injury.
- Lift Correctly: Wet treated timber is heavy. A 3-meter 200x50mm beam can weigh over 20kg. Use two people to lift beams into position.
- Bracing: Temporarily brace your posts with spare timber stakes while you are working. Do not remove braces until the beams and rafters are installed and the structure is rigid.
- Working at Height: Ensure your ladder is on stable footing. If your deck is elevated, be mindful of the edge.
- Chemical Safety: Timber treatment (CCA or similar) is toxic. Do not burn offcuts. Wear a dust mask when cutting and wash your hands before eating.
- Power Tools: Always use an RCD (Residual Current Device) with outdoor power tools.
Finishing and Maintenance
Once constructed, you should coat any cut ends of the timber with a brush-on preservative (like Enseal) to maintain the treatment envelope. Allow the timber to weather for 4-6 weeks before staining or painting, as fresh H3.2/H4 timber has high moisture content and paint may peel if applied immediately.
Do I need council approval for a pergola on a deck?
Generally, pergolas under 20m² (attached) or 30m² (detached) are exempt from building consent in NZ. However, if the pergola has a solid roof (making it a veranda) or is on a deck higher than 1.5m, you may need consent. Always check your local council regulations first.
What is the best timber for a pergola in NZ?
H3.2 treated Pinus Radiata is the standard for above-ground structural components like rafters and beams. For posts, H4 treated pine is recommended for better durability, even if not in ground contact. Macrocarpa and Cedar are premium, naturally durable alternatives but require more maintenance.
How deep should pergola posts be?
If building in the ground, posts should be 600mm to 900mm deep. When building on a deck, depth isn’t the factor; rather, the strength of the bolt connection to the sub-frame (joists/bearers) determines stability.
Can I attach a pergola to the house fascia?
Attaching to the fascia is risky as fascia boards are not structural. It is better to use “roof extenda” brackets that attach to the house top plate or rafters through the roof, or to bolt a ledger board directly to the house studs (requires weatherproofing/flashing).
How far apart should pergola posts be?
Post spacing depends on the size of the beam spanning them. Generally, 150x50mm beams can span up to 2.5m-3m, while larger 200x50mm beams can span 3.5m-4m. Always consult NZS 3604 span tables or a structural engineer.
Should I paint or stain my pergola?
Staining is often preferred for pergolas as it penetrates the wood and doesn’t peel, making re-application easier. Paint offers better UV protection but requires more prep work to recoat in the future.